
When Does Robotic Welding Become Cost-Effective? Volume, Fixtures and Cycle Time
Robotic welding can reduce direct labor per part and improve consistency, but a robot is not automatically the lowest-cost choice. The economic result depends on how often the same weld returns, whether parts locate repeatably, how much fixture and programming work is required, and how much non-welding time remains in the cycle. A well-loaded cell can transform repeat production; a poorly matched project can turn automation into an expensive place to store tooling.
For buyers comparing manual and robotic welding capabilities, the right question is not “How many parts are high volume?” It is “How many conforming parts can the cell produce over the expected program life, after setup, loading, inspection, maintenance and changeovers are included?”
There Is No Universal Volume Threshold
A project does not become suitable for automation at a fixed number such as 500 or 5,000 pieces. Ten thousand parts with distorted incoming components, many short welds and frequent model changes may perform poorly. A smaller recurring order with identical joints, fast loading and a reusable fixture may justify automation sooner.
Evaluate lifetime demand rather than one purchase order. A fixture and program can be amortized across repeated releases if the design remains stable. Conversely, a large launch order followed by uncertain demand may never recover the engineering cost. Product families can also share a cell or modular fixture, improving utilization even when each individual part number has modest volume.
Manual vs Robotic Welding: Where the Economics Differ
Cost driver | Manual welding | Robotic welding | Decision implication |
|---|---|---|---|
Upfront engineering | Low to moderate | Programming, trials and fixture design | Automation needs recoverable demand |
Fixture requirement | May allow flexible clamps | Usually precise and repeatable | Part location can decide viability |
Cycle behavior | Operator-dependent | Repeatable after validation | Stable jobs gain more |
Changeover | Often flexible | Tool and program change required | Mix can reduce utilization |
Arc-on consistency | Varies by access and fatigue | Highly repeatable path and parameters | Useful for repeated joints |
Inspection | Skill and process dependent | Consistent, not self-verifying | Controls still remain necessary |
Best fit | Prototypes, repair, complex variation | Stable repeat production | Choose by total route, not image |
1. Calculate the Full Automation Investment
The robot purchase price is only one element. A project-specific evaluation should include fixture design and build, offline or teach-pendant programming, welding trials, parameter development, safety integration, torch access studies, first-article inspection and any part-design changes. If the supplier already owns the cell, these costs appear as engineering, tooling and setup charges rather than a new machine purchase.
Early engineering and DFM support can reduce this investment by standardizing datums, simplifying joint access and designing one fixture around a family of components. The most economical fixture is not necessarily the least expensive one; it is the fixture that locates the part reliably, loads safely and maintains the required geometry over its service life.
2. Estimate Real Per-Part Savings
Compare complete process costs, not only arc-on labor. Manual cost includes handling, fitting, tack welding, repositioning, welding, cleaning, inspection and rework. The automated route includes loading and unloading labor, fixture clamping, robot motion, arc time, torch cleaning, consumables, scheduled checks and allocated downtime.
A robot may weld quickly but wait for an operator to load a complicated fixture. Dual-station positioners can overlap welding and loading, although they add capital, floor space and balancing requirements. If welding takes 90 seconds but safe loading takes four minutes, the loading operation—not robot speed—sets cell output.
A Simple Break-Even Model
Break-even quantity = incremental automation cost ÷ savings per conforming part
Suppose project-specific fixtures, programming and validation cost $24,000. If the validated robotic route saves $8 per conforming assembly compared with the manual route, simple break-even is 3,000 assemblies. At $3 savings, it becomes 8,000. This calculation is illustrative, not a quotation: actual rates, labor content, utilization, scrap, maintenance, financing and program risk must be modeled for the specific supplier and part.
Illustrative case | Incremental cost | Savings per part | Simple break-even |
|---|---|---|---|
A | $12,000 | $6 | 2,000 parts |
B | $24,000 | $8 | 3,000 parts |
C | $24,000 | $3 | 8,000 parts |
D | $40,000 | $10 | 4,000 parts |

3. Fixture Design Is an Economic Variable
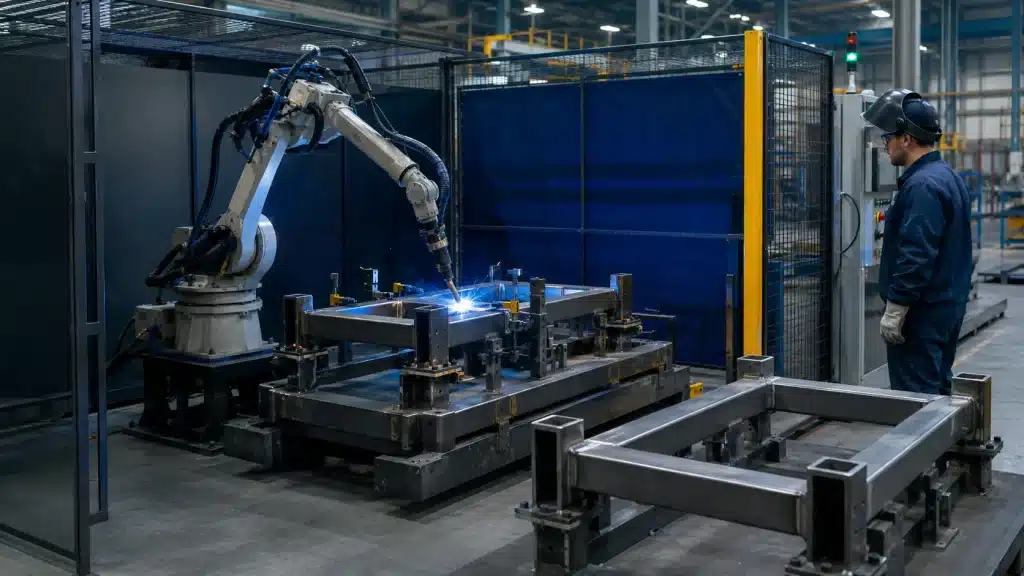
Robotic welding follows the programmed path; it does not compensate for uncontrolled gaps, inconsistent stamping, warped cut blanks or loose component location as intuitively as an experienced welder might. The fixture must establish datums, control joint fit-up, resist welding distortion and allow repeatable clamping without blocking the torch.
- Location: use clear primary, secondary and tertiary datums rather than over-constraining the part.
- Clamping: apply enough force to control fit-up without deforming thin material.
- Access: confirm torch angle, stick-out, cable clearance and collision-free approach.
- Heat: plan sequence, restraint and cooling so the fixture does not merely lock distortion into the assembly.
- Changeover: use foolproof, quick-change or modular elements when a product family shares the cell.
Fixture maintenance also belongs in the cost model. Spatter buildup, worn locators and damaged clamps can gradually shift the weld joint. Durable wear points and a defined inspection interval protect both quality and cycle time.
4. Part Repeatability Starts Upstream
Stable automated welding begins with stable components. Consistent sheet metal laser cutting and press brake bending reduce variation in edge position, hole location, bend angle and flange height. A sophisticated robot cannot economically rescue a stream of blanks that arrive with changing fit-up.
Designs intended for automation often benefit from tabs, slots, locating holes, self-fixturing features and controlled gap conditions. These features must support function and weld quality; they should not create weak sections, inaccessible crevices or visible cosmetic defects. Tolerance decisions must consider the complete stack, not each component in isolation.
5. Measure Total Cycle Time, Not Robot Motion Alone
Cycle time should begin when one conforming part leaves the fixture and end when the next conforming part reaches the same point. Include load, clamp, part detection, robot travel, gas pre-flow, arc start, welding, repositioning, interpass waits, torch cleaning, unclamping, unloading and routine inspection. Separate recurring cycle elements from changeover and batch setup.
Arc-on percentage is useful but not sufficient. Faster travel may reduce penetration margin or increase defect risk; fewer welds may require a design change. The goal is the lowest repeatable cost for an acceptable assembly, not the shortest simulated robot path.
6. Product Mix and Changeovers Can Reverse the Result
High-mix production can still use robotics, especially with offline programming, modular tooling and product families, but every changeover consumes capacity. Count fixture exchange, program verification, parameter confirmation, first-off inspection and material handling. A cell that looks highly utilized may produce little saleable output if it spends too much time changing between short runs.
Design stability matters as well. A late change to joint location, flange length or access can require fixture modification and revalidation. When revisions are frequent, manual welding may be the lower-risk bridge until the product matures.
7. Quality Savings Must Be Proven, Not Assumed
Robotic welding can improve bead placement, travel speed and parameter consistency, but repeatability is not the same as correctness. A robot can reproduce an incorrect program or a bad fit-up with impressive discipline. Qualified procedures, verified parameters, controlled consumables, fixture checks and inspection remain necessary.
For repeated stainless steel fabrication, automation may help control heat input and appearance when fit-up and shielding are stable. The approved process still needs to address distortion, discoloration, cleanliness and any post-weld finish. Nova’s quality and project approach can align inspection frequency and documentation with drawing risk.

8. Include Capacity, Resilience and Labor Strategy
The business case may include more than direct savings. Automation can add predictable capacity, reduce ergonomic exposure and free skilled welders for complex assemblies, prototypes and recovery work. Those benefits are real but should be quantified carefully. One automated cell can also create a single point of failure, so maintenance response, spare parts, alternate routing and manual recovery plans matter.
A broader custom metal manufacturing review should test whether cutting, forming, welding, finishing and inspection capacities are balanced. Automating welding will not improve delivery if the constraint immediately moves to fixture loading, coating or final inspection.
Robotic Welding Suitability Checklist
Question | Favorable signal | Warning signal |
|---|---|---|
Demand | Recurring, forecastable lifetime volume | One uncertain or shrinking order |
Design | Stable revision and joint locations | Frequent engineering changes |
Components | Repeatable dimensions and fit-up | Variable gaps or distorted blanks |
Weld access | Consistent torch approach | Occluded or highly variable joints |
Fixture | Safe, repeatable and maintainable | Complex loading or fragile location |
Cycle balance | Loading overlaps or matches welding | Robot waits for manual handling |
Product mix | Families share tools and programs | Many unrelated short runs |
Quality | Measurable savings in defects/rework | Assumed quality with no validation |
Payback | Recovered within program horizon | Savings depend on perfect utilization |
What to Include in a Robotic Welding RFQ
- Demand: prototype, batch, annual and program-life volumes with release pattern.
- Product data: current STEP models, drawings, BOM, revision status and approved substitutions.
- Weld definition: joint type, size, length, quality level, appearance and applicable procedure requirements.
- Incoming variation: component tolerances, gap limits, coating condition and known distortion.
- Commercial scope: fixture ownership, tooling life, change responsibility, packaging and delivery.
- Quality records: first article, sampling, traceability, certificates and retention expectations.
Frequently Asked Questions
Is robotic welding always faster than manual welding?
The arc path may be faster and more consistent, but total cycle time can be limited by loading, clamping, repositioning, cleaning and inspection. Compare complete conforming-part cycles.
Can low-volume parts use robotic welding?
Yes, when programming is efficient, fixtures are reusable, joint access is simple or several related parts share the cell. Low volume alone does not rule automation out.
Who should own the welding fixture?
Either buyer or supplier may own it. The quotation should define ownership, storage, maintenance, modification rights, useful life and what happens when the drawing changes.
Does a robot eliminate the need for qualified welders?
No. Skilled personnel are still needed for process development, procedure control, setup, troubleshooting, inspection and work that does not suit automation.
What is the most common business-case mistake?
Using theoretical arc time and optimistic utilization while excluding loading, changeovers, fixture maintenance, trials, downtime, inspection and design-change risk.
Validate the Business Case with a Pilot Run
Before committing a long-running program to robotic welding, validate the assumptions with representative components, production-intent material and an agreed fixture concept. A pilot should test more than whether the robot can physically reach the weld. It should demonstrate that incoming parts locate consistently, operators can load the fixture safely, the process produces acceptable welds and the complete cycle supports the cost model.
- Confirm fit-up: measure variation across several component sets rather than proving the process on one specially selected assembly.
- Time the whole cycle: record loading, clamping, welding, torch service, unloading and routine checks separately.
- Inspect output: compare weld size, location, penetration evidence, distortion and cosmetic requirements with the released criteria.
- Stress the changeover: if the business case depends on multiple products, exchange tooling and verify the next first-off part.
The pilot should also identify ownership of remaining risk. A sensor may detect part presence but not guarantee an acceptable joint gap. Seam tracking may improve tolerance to some variation, but it adds cost and cannot replace sound part design. Similarly, automatic parameter monitoring can document the commanded process without proving every internal weld characteristic.
After the trial, update the quotation model with observed rather than theoretical times. Separate one-time learning from recurring production work, and state the planned improvement actions. If the fixture or component design must change, include the cost and revalidation schedule before approving payback. A pilot that challenges the assumptions is more valuable than a demonstration optimized only to make the robot look fast.